Create Custom WaveMaps
from DAW Recordings for Legacy ToneDexter

Customized WaveMaps
Some users have asked for a method of altering the tonal balance or EQ of WaveMaps after they are created. This is currently not possible within ToneDexter.
However, there is a method available to users who have a DAW (digital audio workstation) and audio interface. This method allows them to train from a pair of recorded tracks, rather than from a live performance. Assuming the signal levels are within proper ranges, ToneDexter doesn’t know the difference and creates the same WaveMap in either case. EQ can easily be applied to the tracks and new WaveMaps created that have an altered tonal balance.
This technique is also useful in cases where the target instrument is different than the source instrument. For example, you might want to create a WaveMap on your full-bodied acoustic cello (the source instrument), and modify it to work properly on your solid body electric cello (the target instrument).
Because of differences between the pickups, EQ will usually be necessary to make the WaveMap sit right.
Steps for Tweaking a WaveMap where Source and Target Instruments are the Same:
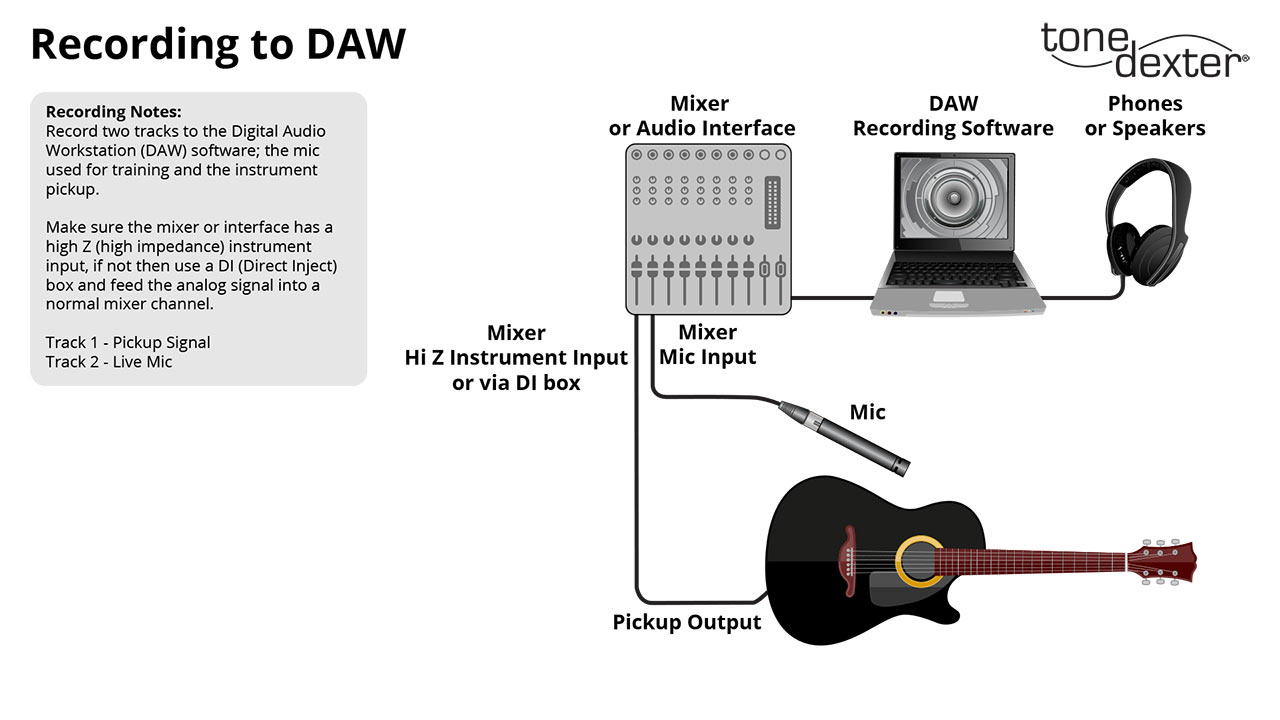
- Record a pair of tracks into a DAW while playing your instrument as if you were training, per figure 1. The raw pickup signal is recorded onto track 1, and the live mic is simultaneously recorded onto track 2. See note 1.
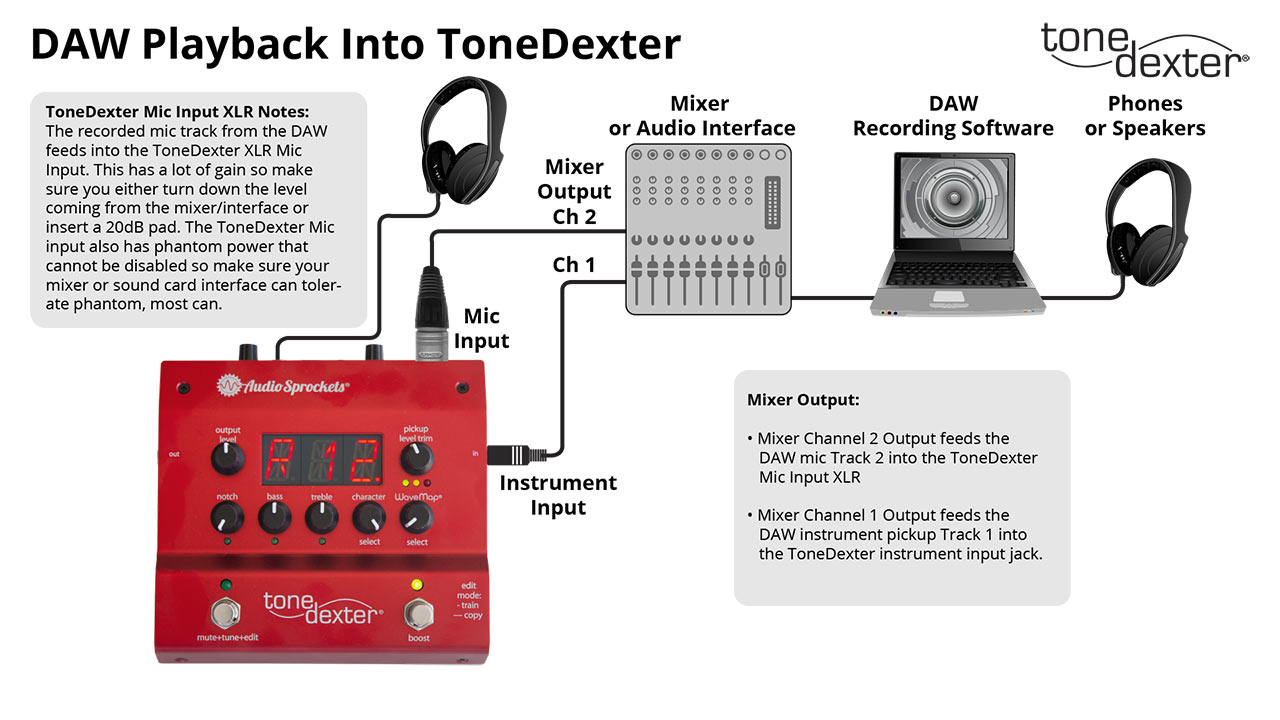
- Route the DAW’s outputs to ToneDexter per figure 2. While optionally listening with headphones connected to ToneDexter, put it into training mode and play back the prerecorded tracks. ToneDexter will train and create a WaveMap. Store it in any slot you like. See notes 2, 3.
- Rewind the track, and audition the newly saved WaveMap by playing the recorded pickup track 1 through ToneDexter in play mode. Listen back with ToneDexter plugged into the amp or speakers of your choice, or with phones.
- Add an EQ plugin to the pickup track 1 in your DAW, and while playing the track through ToneDexter, adjust the EQ so that you get the desired tonal balance. Save your EQ curve in a preset.
- Disable or remove the EQ preset from the pickup track 1, and instead put the same EQ preset on the mic track 2.
- Retrain ToneDexter by repeating step 2. Store the new WaveMap in another convenient slot. The resulting WaveMap should match what you heard when tweaking the pickup track EQ playing through the first WaveMap. If it does, save it and you’re done. If not, repeat steps 4-6.
Steps for Tweaking a WaveMap where Source and Target Instruments are Different:
- Record a pair of tracks into a DAW while playing your source instrument as if you were training, per figure 1. The raw pickup signal is recorded onto track 1, and the live mic is simultaneously recorded onto track 2. See note 1.
- Route the DAW’s outputs to ToneDexter per figure 2. While optionally listening with headphones connected to ToneDexter, put it into training mode and play back the prerecorded training tracks. ToneDexter will train and create a WaveMap. Store it in any slot you like. See notes 2, 3.
- On track 1, but on separate part of your DAW timeline, record a short performance track of your target instrument plugged directly into your DAW. This will be used for tonal balance assessment, so play as much variety as you need to properly judge it.
- Audition the newly saved WaveMap by playing the recorded performance track 1 of your target instrument through ToneDexter in play mode. Listen back with ToneDexter plugged into the amp or speakers of your choice, or with phones.
- Add an EQ plugin to the pickup track 1 in your DAW, and while playing the performance track through ToneDexter, adjust the EQ so that you get the desired tonal balance. Save your EQ curve in a preset.
- Disable or remove the EQ preset from the pickup track 1, and instead put the same EQ preset on the mic track 2.
- Retrain ToneDexter by repeating step 2. The resulting WaveMap should match what you heard when tweaking the pickup track EQ playing through the first WaveMap. If it does, save it and you’re done. If not, repeat steps 4-7.
Notes:
- If your pickup is passive, make sure it is plugged into an instrument input with impedance of 1MΩ or greater on your sound card or mixer. If it doesn’t have an instrument input, use an active DI box to provide this function. If your pickup is active, then you can plug straight into a line level input and not worry about the impedance.
- ToneDexter has fixed hardware gain on its mic input and is designed for typical mic levels. Therefore, when driving it from a sound card or mixer, you must reduce the level of the output so that it is at mic level, and not line level. Either turn it way down, or insert a 20dB pad if necessary. Since there is no signal level indicator on the XLR input, you may need to audition the mic track during training and listen (with phones) to make sure it isn’t overdriving the input.
- ToneDexter’s XLR jack has phantom power that can’t be disabled, so make sure your mixer or soundcard’s output will tolerate 48V phantom power. Most will.


